1. 前言
上一篇文章介绍了socks5协议的工作过程和协议的细节,通过上一篇文章我们可以认识到socks5协议主要有3个阶段,分别为: 协商、请求,转发(Relay)。本文将手把手使用Java语言实现一个简单的socks5代理
特别提醒: 本文目的仅作为加深socks5协议理解,其中的代码并不是严谨的代码,也没考虑其他的情况。在实际的开发过程中,需要考虑更多的意外情况。
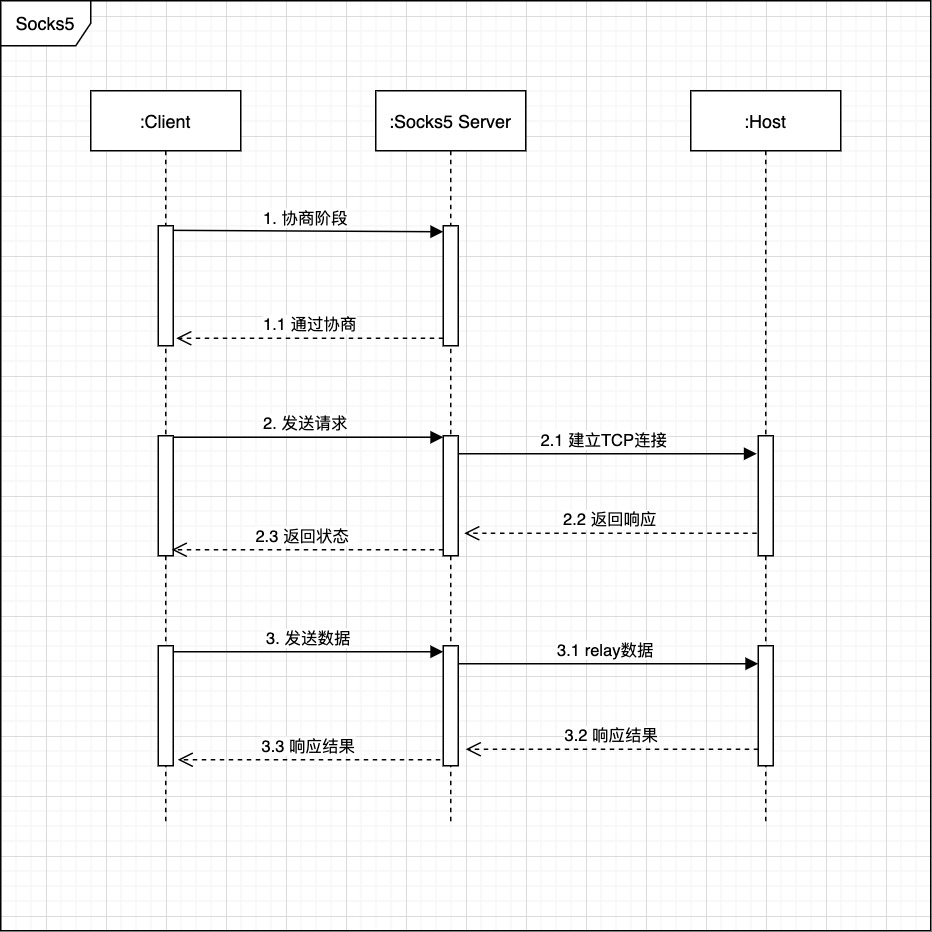
上一篇文章中有一张时序图展示了socks5的大概工作过程,本文将使用Java把这些过程一一实现。
2. 准备
本文完整代码请点击socks5-server查看。为了方便理解,本文使用BIO编写,对应的类是ServerSocket和Socket。在正式开始之前,我们需要创建一个ServerSocket类来接受客户端请求,代码如下:
public class Socks5Acceptor implements Runnable{
  private final int port;
  private final BlockingQueue<Socket> queue;

  Socks5Acceptor(int port,BlockingQueue<Socket> queue) {
    this.port = port;
    this.queue = queue;
  }

  @Override
  public void run() {
    try {
      ServerSocket socket = new ServerSocket(port);
      while (true) {
        Socket client = socket.accept();
        queue.put(client);
      }
    } catch (Exception e) {
      e.printStackTrace();
    }
  }
}
我们使用一个线程用来Accept来自客户端的连接,并把Socket放进一个队列中; 与此同时,我们需要一个Processor来处理Acceptor接受的client,代码如下:
public class Socks5Processor implements Runnable{
    private final BlockingQueue<Socket> queue;
    private final Socks5Handler handler = new Socks5Handler();

    public Socks5Processor(BlockingQueue<Socket> queue) {
        this.queue = queue;
    }

    @Override
    public void run() {
        while (true) {
            try {
                Socket client = queue.take();
                handler.handle(client,true);
            } catch (InterruptedException e) {
                e.printStackTrace();
            }
        }
    }
}
Socks5Processor取出BlockingQueue中的client对象,然后创建Socks5Handler来处理。在这里,Socks5Handler就是接下来我们要讲的主题,里面包含了socks5的协商、认证以及relay过程。
3. Socks5代理
3.1 协商阶段
根据RFC1928的规定,socks5客户端在第一次连接时,会发送认证协商请求,这里重复贴一下上篇文章的内容
/*
 *  request:
 *  +----+----------+----------+
 *  |VER | NMETHODS | METHODS  |
 *  +----+----------+----------+
 *  | 1  |    1     | 1 to 255 |
 *  +----+----------+----------+
 *
 *   response:
 *   +----+--------+
 *   |VER | METHOD |
 *   +----+--------+
 *   | 1  |   1    |
 *   +----+--------+
 */
我们需要读取socket中的字节流,并逐个解析内容,connect方法如下:
private void connect(Socket client, boolean allowAnon) throws IOException {
  InputStream is = client.getInputStream();
  OutputStream os = client.getOutputStream();

  //--------segment 1-----------
  byte[] buffer = new byte[257];
  int len = is.read(buffer);
  if (len <= 0) {
    os.close();
    return;
  }

  //VER
  int version = buffer[0];
  if (version != 0x05) {
    os.write(new byte[]{5,-1});
    return;
  }
  //--------segment 1-----------

  //--------segment 2-----------
  //NO AUTHENTICATION REQUIRED
  if (allowAnon) {
    os.write(new byte[]{5,0});
    waitingRequest(client);
    return;
  }

  if (len <= 1) {
    os.write(new byte[]{5,-1}); //-1 = 0xFF
    return;
  }
  //--------segment 2-----------

  //--------segment 3-----------
  //NMETHODS
  int methods = buffer[1];
  for (int i=0;i<methods;i++) {
    //username password authentication
    if (buffer[i+2] == 0x02) {
      os.write(new byte[]{5,2});
      if (doAuthentication(client)) {
        waitingRequest(client);
      }

      return;
    }
  }

  os.write(new byte[]{5,-1});
}
上面代码共分为4个片段,表达的意义如下:
segment 1
创建一个257字节大小的byte数组作为buffer,把客户端首次请求的数据全部读进buffer,再取出第一个字节,判断版本号。如果版本号不为5,就发送error断开连接。
segment 2
segment 2判断server的配置是否允许匿名,如果允许直接返回[5,0]不需要进行下一步认证。
segment 3
segment 3使用0x02认证方式,即用户名和密码的认证。这种认证方式在RFC1929中详细叙述。
3.2 认证阶段(子协商)
在上一个阶段如果我们返回0x02就会进入用户名密码的认证阶段,此时socks5客户端会发送用户名和密码请求,格式如下:
/**
*  +----+------+----------+------+----------+
*  |VER | ULEN |  UNAME   | PLEN |  PASSWD  |
*  +----+------+----------+------+----------+
*  | 1  |  1   | 1 to 255 |  1   | 1 to 255 |
*  +----+------+----------+------+----------+
*
*  +----+--------+
*  |VER | STATUS |
*  +----+--------+
*  | 1  |   1    |
*  +----+--------+
*/
在3.1代码中的doAuthentication就是读取客户端发送的数据,代码如下
private static boolean doAuthentication(Socket client) throws IOException{
  InputStream is = client.getInputStream();
  OutputStream os = client.getOutputStream();
  byte[] buffer = new byte[512];
  int len = is.read(buffer);
  if (len <= 0) {
    //TODO throw exception
    client.close();
    return false;
  }

  int ver = buffer[0];
  if (ver != 0x01) {
    os.write(new byte[]{5,1});
    return false;
  }

  if (len <= 1) {
    os.write(new byte[]{5,1});
    return false;
  }

  UserInfo info = UserInfo.parse(buffer);
  if (info.match("bigbyto","123456")) {
    //SUCCESSFUL
    os.write(new byte[]{1,0});
    return true;
  }

  //AUTHENTICATION FAILURE
  os.write(new byte[]{1,1});
  return false;
}

private static class UserInfo {
  String username;
  String password;

  public static UserInfo parse(byte[] data) {
    int uLen = data[1];
    byte[] uBytes = new byte[uLen];
    System.arraycopy(data,2,uBytes,0,uBytes.length);;

    UserInfo info = new UserInfo();
    info.username = new String(uBytes);

    int pLen = data[uLen + 2];
    byte[] pBytes = new byte[pLen];
    System.arraycopy(data,uLen + 3,pBytes,0,pBytes.length);
    info.password = new String(pBytes);

    return info;
  }

  public boolean match(String username,String password) {
    return username.equals(this.username) && password.equals(this.password);
  }
}
这部分代码其实没什么值得说的,逻辑基本上和3.1差不多,读取socks5客户端发出的认证请求,然后解析出用户名和密码,再比对返回认证结果。
3.3 请求阶段
当必须要客户端认证,或者客户端通过认证,即将进入请求阶段,socks5客户端向socks5 server发送目标网站的地址信息。
/**
*   socks5 client request
*   +----+-----+-------+------+----------+----------+
*   |VER | CMD |  RSV  | ATYP | DST.ADDR | DST.PORT |
*   +----+-----+-------+------+----------+----------+
*   | 1  |  1  | X'00' |  1   | Variable |    2     |
*   +----+-----+-------+------+----------+----------+
*
*   socks5 server response
*   +----+-----+-------+------+----------+----------+
*   |VER | REP |  RSV  | ATYP | BND.ADDR | BND.PORT |
*   +----+-----+-------+------+----------+----------+
*   | 1  |  1  | X'00' |  1   | Variable |    2     |
*   +----+-----+-------+------+----------+----------+
*/
如果读者看不懂这里,可以参考上一篇文章理解socks5协议的工作过程和协议细节或参考RFC1928。
根据我们之前的描述,在这个阶段我们需解析出客户端发过来的target server地址,然后向它发起一个TCP/UDP请求。
private void waitingRequest(Socket socket) throws IOException{
  InputStream is = socket.getInputStream();
  OutputStream os = socket.getOutputStream();

  byte[] buffer = new byte[256];
  int len = is.read(buffer);
  if (len <= 0) {
    socket.close();
    return;
  }

  int ver = buffer[0];
  if (ver != 0x05) {
    os.write(new byte[]{5,1,0,1,0,0,0,0,0});
    return;
  }

  int cmd = buffer[1];
  //ONLY ACCEPT CONNECT
  if (cmd != 0x01) {
    os.write(new byte[]{5,1,0,1,0,0,0,0,0});
    return;
  }

  RemoteAddr addr = getRemoteAddrInfo(buffer,len);
  socket.getOutputStream().write(new byte[]{5,0,0,1,0,0,0,0,0,0});

  relayHandler.doRelay(socket, addr.addr,addr.port);
}

private RemoteAddr getRemoteAddrInfo(byte[] bytes,int len) {
    byte atype = bytes[3];
    String addr;
    try {
        if (atype == ATYPE_IPv4) {
            byte[] ipv4 = new byte[4];
            System.arraycopy(bytes,4,ipv4,0,ipv4.length);
            addr = Inet4Address.getByAddress(ipv4).getHostAddress();
        }
        else if (atype == ATYPE_IPv6) {
            byte[] ipv6 = new byte[16];
            System.arraycopy(bytes,4,ipv6,0,ipv6.length);
            addr = Inet6Address.getByAddress(ipv6).getHostAddress();
        }
        else if (atype == ATYPE_DOMAINNAME) {
            int domainLen = bytes[4];
            byte[] domain = new byte[domainLen];
            System.arraycopy(bytes,5,domain,0,domain.length);
            addr = new String(domain);
        }
        else {
            throw new RuntimeException("Unknown address type: " + atype);
        }
    } catch (UnknownHostException e) {
        throw new RuntimeException(e);
    }

    RemoteAddr info = new RemoteAddr();
    info.addr = addr.trim();

    ByteBuffer buffer = ByteBuffer.wrap(new byte[]{bytes[len-2],bytes[len-1]});
    info.port = buffer.asCharBuffer().get();

    return info;
}
上面代码解析了客户端发送过来的数据,并且拿到了目标主机的地址(ip或域名)和端口,且在最后,把这些信息交给relayHandler进行relay。
在这个阶段,我们的socks5 server就成功扮演了中间人的角色,建立了一条client–>socks5–>target server的一条链路。
3.4 Relay阶段
relay阶段主要是把来自于client inputstream的所有数据转发到target server的outputstream,同理,也会把target server inputstream的所有数据转发到client outputstream。Socks5RelayHandler代码如下:
public class Socks5RelayHandler {

    public void doRelay(Socket client, String addr, int port) {
        Socket relay = null;
        try {
            relay = new Socket(addr,port);
            relay.setSoTimeout(30 * 1000);
            Socks5Pipe p1 = new Socks5Pipe(client,relay,"client");
            Socks5Pipe p2 = new Socks5Pipe(relay,client,"server");

            p1.relay();
            p2.relay();
        } catch (IOException e) {
            try {
                if (relay != null && !relay.isClosed()) {
                    System.out.printf("address: %s, reason: %s",relay.getInetAddress(),e.getMessage());
                    relay.close();
                }

                if (!client.isClosed()) {
                    client.close();
                }
            } catch (Exception e1) {
                e1.printStackTrace();
            }
        }
    }

    static class Socks5Pipe implements Runnable{
        private String id;
        private final Socket source;
        private final Socket target;

        Socks5Pipe(Socket source, Socket target,String id) {
            this.source = source;
            this.target = target;
            this.id = id;
        }

        public void relay() {
            Thread t = new Thread(this);
            t.setName("Socks5-Thread-" + target.getInetAddress().toString());
            t.start();
        }

        @Override
        public void run() {
            try {
                InputStream sis = source.getInputStream();
                OutputStream tos = target.getOutputStream();

                byte[] buffer = new byte[1024];
                int len;
                while ((len = sis.read(buffer)) > 0) {
                    tos.write(buffer,0,len);
                }

                close();
            } catch (IOException e) {
                System.out.printf("address: %s, reason: %s\n",source.getInetAddress(),e.getMessage());
                close();
                e.printStackTrace();
            }
        }

        public void close() {
            try {
                System.out.println(id + " close");

                if (!source.isClosed()) {
                    source.close();
                }

                if (!target.isClosed()) {
                    target.shutdownInput();
                }
            } catch (IOException e) {
                System.out.println("close socket error");
                e.printStackTrace();
            }
        }
    }
}
4. 组装执行
上面代码是主要流程,接下来就是组装运行了。代码非常简单,如下
public class Socks5Server {
    public static void main(String[] args) throws Exception{
        LinkedBlockingQueue<Socket> queue = new LinkedBlockingQueue<>();

        Socks5Acceptor acceptor = new Socks5Acceptor(7582,queue);
        Socks5Processor processor = new Socks5Processor(queue);

        new Thread(acceptor).start();
        new Thread(processor).start();

        Thread.currentThread().join();
    }
}
执行上面代码后,本地开始监听7582端口。我们可以使用curl来测试是否正常工作
#不需要认证
curl -x socks5h://127.0.0.1:7582 http://a.baidu.com

#如果需要认证
curl -x socks5h://bigbyto:123456@127.0.0.1:7582 http://a.baidu.com

#返回结果为OK
#OK